Tips on How to Cut Videos in Davinci Resolve
Tips on How to Cut Videos in Davinci Resolve
ABSTRACT: At first, attempting to cut clips sometimes seems intimidating. There is plenty for you to process.
PAGE TITLE (1): Guide on How to Cut a Clip in Davinci Resolve
PAGE TITLE (2): Ways on How to Cut Clips in Davinci Resolve
META DESCRIPTION: Do you intend to make a short film or a film that will capture the attention of the audience? Here are some methods for cutting clips with davinci resolve.
KEYWORDS: how to cut videos in davinci resolve, how to cut a clip in davinci resolve, how to cut clips in davinci resolve
Cuts are among the most popular and efficient methods in video editing for creating the ideal flow. Cutting images at the right moments is necessary for the videos to flow perfectly. DaVinci Resolve is an excellent tool for video cutting. As a matter of fact, learning how to cut videos in davinci resolve allows you to create high-quality videos.
Additionally, this tool is considered one of the most exemplary video editing programs available. But it is not without numerous shortcomings. For one, DaVinci Resolve requires at least 16GB of RAM. So, you may want to use alternatives if your PC is not powerful enough.

IMAGE FILE NAME: features-davinci-resolve.jpg
ALT TEXT: features of davinci resolve
Here, we will talk about how to cut clips in DaVinci Resolve and what's a better alternative.

IMAGE FILE NAME: layouts-on-how-to-cut-a-clip-in-davinci-resolve.jpg
ALT TEXT: how to cut a clip davinci resolve layouts
How to Cut a Clip in Davinci Resolve
There are two methods on how to cut a clip in DaVinci Resolve. One technique is making the cuts before arranging the clips. Another is using the “Cut” tool while the clips are already in the timeline.
Method 1. Cut a Clip in the Source Viewer/Monitor
One of the fundamental video editing skills you'll really have to grasp in DaVinci Resolve is splitting and, in certain situations, merging clips. Users can learn how to cut a clip in davinci resolve before adding it to the timeline by using this technique. By keeping order in your chronology, this method aids.
1. Insert the video and navigate to the cut tab.
This method includes tips on how to cut videos in Davinci Resolve before creating the chronology. After importing the video, select the "Cut" tab from the bottom control panel.

IMAGE FILE NAME: insert-video-and-navigate-how-to-cut-clips-in-davinci-resolve.jpg
ALT TEXT: insert video and navigate on how to cut clips in davinci resolve
2. Select and edit the video.
Adjust the sliders below the "Preview" tab to cut the video. What's outside of the sliders will be removed.

IMAGE FILE NAME: edit-and-select-how-to-cut-videos-in-davinci-resolve.jpg
ALT TEXT: edit and select on how to cut videos in davinci resolve
3. Adjust the timeline
Drag and drop the video toward the new timeline after you've trimmed it. You can continue editing since you'll only have the desired portion of the footage on how to cut a clip in davinci resolve. In addition, you may also add slow-motion effects or transition effects to smoothen the transition to the next clip.

IMAGE FILE NAME: adjust-timeline-on-how-to-cut-a-clip-in-davinci-resolve.jpg
ALT TEXT: adjust the timeline on how to cut a clip in davinci resolve
Method 2. Cut a Clip in the Timeline
This technique involves utilizing your timeline's "Cut" tool directly. There are three different ways on how to cut a clip in davinci resolve.
Ctrl + \
Go to the Edit page by clicking "Edit" from the bottom control panel. Select the clip you want to cut from the timeline. Then, go to the part where you want to cut the video. Press Ctrl + \. This method will show you how to cut a clip in Davinci Resolve.

IMAGE FILE NAME: ctrl-backslash-on-how-to-cut-a-clip-davinci-resolve.jpg
ALT TEXT: ctrl backslash shortcut on how to cut a clip in davinci resolve
2. Click the Razor Button
Go to the toolbar and click the "razor" button. This is called “Blade Edit Mode.” Click on the part of the video clip on the timeline where you want to cut it. As a result, this will demonstrate how to cut videos in DaVinci Resolve. You can keep clicking to make more cuts. To exit this mode, click the "cursor" button on the toolbar.

IMAGE FILE NAME: how-to-cut-a-clip-in-davinci-resolve-blade-edit-mode.jpg
ALT TEXT: how to cut a clip in davinci resolve with blade edit mode
3. Customized Shortcut
Using the razor button is inconvenient because switching between different tools takes time. But suppose you want a shortcut easier to press than Ctrl + \. You can modify it and enter the one that makes it easier for you to understand how to cut a clip in davinci resolve.
Click DaVinci Resolve at the top left corner of the screen. Then, click "Keyboard Customization." Alternatively, you can press Ctrl + Alt + K. Locate "Split Clip" under "All Commands." Type your preferred key in the blank space. Hit save and close the menu. Now, you can cut a video every time you are in Edit mode, and you press that key.

IMAGE FILE NAME: how-to-cut-a-clip-in-davinci-resolve-shortcut-customizer.jpg
ALT TEXT: how to cut a clip in davinci resolve with shortcut customizer
4. Trim Edit Mode
In Trim Edit Mode, you can drag from either end of the video to cut it. This method on how to cut clips in Davinci Resolve works best when only a few seconds are cut from either end of a video

IMAGE FILE NAME: trim-edit-mode-on-how-cut-a-clip-in-davinci-resolve.jpg
ALT TEXT: trim and edit mode on how to cut a clip in davinci resolve
A Better Choice to Cut Clips for no Matter Beginners or Professionals
DaVinci Resolve is an excellent video-cutting tool. However, it requires a lot of system resources. Therefore, DaVinci Resolve is not the best choice if you have a low-end PC. Aside from that, DaVinci Resolve is a complex program that has a high learning curve. So, it is also not ideal for beginners.
The Filmora Video Editor by Wondershare is a fantastic alternative. As with DaVinci Resolve, it includes several excellent capabilities, such as adding filters, titles, texts, and more. You can also use Filmora for cutting and joining videos.
Does that mean Filmora is as complex as DaVinci Resolve? No, it is not. In contrast, you don't need any prior experience to make excellent videos with this editor. Filmora is very easy to use and accessible. It's available on macOS and Windows.
Highlights of Filmora
Users of Wondershare Filmora can add moving graphics by dragging and dropping them into their videos.
Users can select the ideal royalty-free tune from a music library and effortlessly merge multiple movies and photos.
Users can use the video stabilization feature to remove the camera shake.
Users can modify each track's audio using the native audio mixer tool.
Users can use the Noise removal tool to make their videos more professional.
Includes basic editing features like GIF compatibility, Color adjustment, Color Tuning, and even Scene detection.
Methods to Cut Clips in Filmora
Routine video editing tasks include removing pointless parts from a recorded video. Even though you made a good video, it is too large or unsatisfactory to share because it has some extra clips and useless stuff.
Wondershare Filmora is a user-friendly yet capable video editing program that enables you to split videos into many parts and offers a variety of video editing features to help you create a fantastic home movie.
Method 1. Cut, Split, and Trim Videos in Filmora
1. Import videos to Filmora Video Cutter
Launch the video cutter after installation, then choose New Project to access the video editing window. The movie that needs to be divided into various sections must now be imported. You can drag and drop files towards the media files before importing them towards the timeline for editing, or you can click "Import" just on the main screen and choose files from your computer.

IMAGE FILE NAME: import-videos-to-filmora-video-cutter.jpg
ALT TEXT: import videos to filmora video cutter
IMAGE LINK: https://images.wondershare.com/filmora/article-images/filmora9-import-options.jpg
2. Trim, split, and delete videos manually.
First, drag videos from the media library to the video track on the timeline.
Suppose you want to trim the beginning or the ending part of the video. You can use the trim feature. Zoom in on the timeline, then drag the trim icon. Ensure only the parts of the video that you want to remain are highlighted. If you want to remove the beginning, drag the trim icon to the right. Conversely, if you want to remove the ending part, drag the trim icon to the left.
What if you want to cut the video into parts, delete some, and then merge the remaining? The cutting tool is the appropriate tool to use.
Move the playhead to the beginning position of the video part you want to cut. Then, click the Split icon (scissors) on the toolbar. Move the playhead to where you want the cut part to end. Click the Split icon again. Repeat this to cut your video into multiple pieces. Then, delete the unwanted parts.
You can also cut videos into different parts to rearrange the sequence.

IMAGE FILE NAME: deleting-videos-manually-wondershare-filmora.jpg
ALT TEXT: delete videos manually in wondershare filmora
IMAGE LINK: https://images.wondershare.com/filmora/guide/cut-a-section.jpg
3. Publish the video
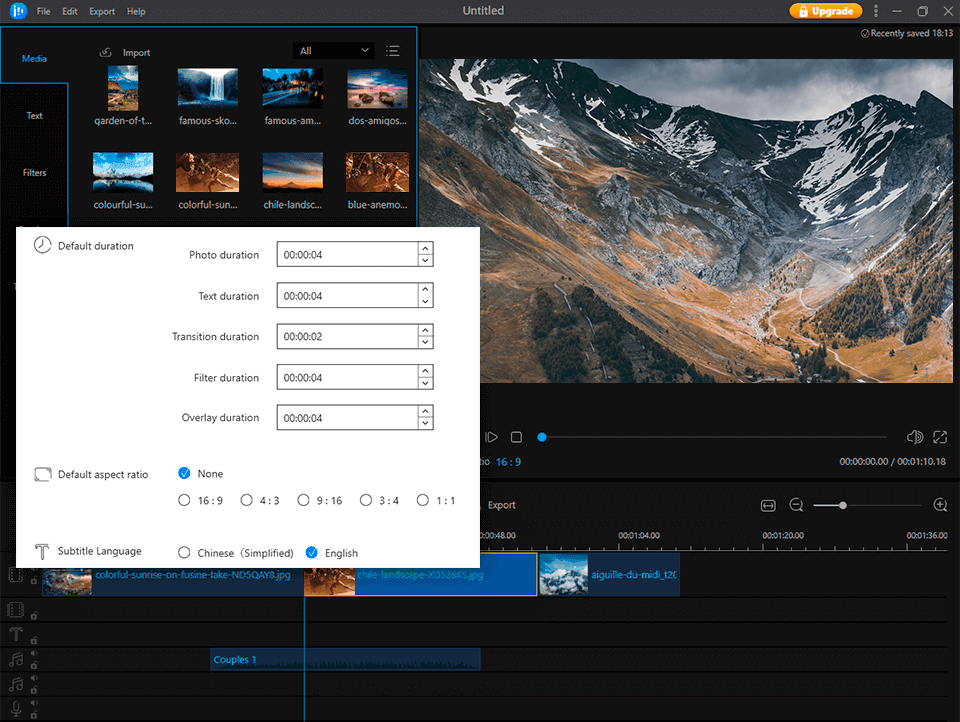
Select the "Export" button located on the screen once you've performed basic editing and cutting. By selecting "Format" and entering the appropriate information, including the frame rate and resolution, you may save the clip in plenty of other codecs on the local computer. Click "Device" and choose the thumbnails of your iPod, iPhone, or iPad to play the video you created. You can also instantly upload your videos to YouTube or Vimeo, or burn your recordings to DVD for better video preservation.

IMAGE FILE NAME: publish-video-wondershare-filmora.jpg
ALT TEXT: publish the video in wondershare filmora
IMAGE LINK: https://images.wondershare.com/filmora/article-images/filmora9-export-options.jpg
Method 2: Trim Big Videos and Integrate Without Losing Quality
In addition to the ways previously stated, Filmora's Instant Cutter Tool enables you to chop huge 4K videos or camcorder videos without re-encoding or quality loss.
1. Prior to choosing Import using Instant Cutter Tool, click the Import button.

IMAGE FILE NAME: import-with-instant-cutter-tool-wondershare.jpg
ALT TEXT: import with instant cutter tool in wondershare
IMAGE LINK: https://images.wondershare.com/filmora/article-images/trim-with-instant-cutter-tool.jpg
2. Use the cutting sliders, the predefined in-and-out points, or the beginning and ending times.

IMAGE FILE NAME: drag-and-drop-videos-wondershare-filmora.jpg
ALT TEXT: drag and drop videos using wondershare filmora
IMAGE LINK: https://images.wondershare.com/filmora/guide/2-instant-cutter-trimming-interface.jpg
3. To create a new video clip, just use the Add Segment feature.

MAGE FILE NAME: wondershare-filmora-add-segment-feature.jpg
ALT TEXT: add segment feature in wondershare filmora
IMAGE LINK: https://images.wondershare.com/filmora/guide/11-instant-cutter-add-segment.jpg
In addition to cutting videos, you may also edit them in other ways, such as rotating or joining many films together. To learn more guides utilizing Filmora, visit Think Bigger From Filmora User Guide or you may just simply watch this video tutorial below for further information.
Insert the video: How to Split Videos in Filmora in Four Ways
Bottomline
No one can deny how amazing of a video cutting tool DaVinci Resolve is. It equips you with all the necessary tools you need to make high-quality videos. However, it has some imperfections that you can't ignore. It's complex and has a lot of system requirements. That said, using Wondershare Filmora could be miles better for beginners and even professionals. It's relatively lighter and simpler, but it also provides you with all the tools you would need.